Показаны сообщения с ярлыком macro. Показать все сообщения

Have a macro that you’d like to run on all models in a directory while out of the office?

Solidworks Task Scheduler Custom Task
Create Custom Task

Enter the Task Scheduler. Located in the SolidWorks Tools directory in your Start Menu, this program allows you to schedule batch operation tasks like updating the versions of your files, converting your models to DXF, updating custom properties, and so on. Those with SolidWorks Professional or Premium have the “Run Custom Task” option, which allows you to schedule the execution of a macro as well as specify its parameters.


As an example, let’s say that each night at 12:00 AM you want to open up every part in a directory and change the display setting to “shaded without edges”. Here are the steps you would follow:


1. Write a macro that opens up every part in a specified directory and changes the display the setting. In the code below you can see that the current specified directory is “C:\custom_task\”.

Dim swApp As SldWorks.SldWorks
Dim swModel As SldWorks.ModelDoc2
Const strFolderPath As String = "C:\custom_task\"
Dim strFileName As String
Sub main()
Set swApp = Application.SldWorks
strFileName = Dir(strFolderPath & "*.SLDPRT")
While strFileName <> ""
Set swModel = swApp.OpenDoc6(strFolderPath & strFileName, _
swDocPART, 1, Empty, Empty, Empty)
swModel.ViewDisplayShaded
swModel.Save3 1, Empty, Empty
swApp.QuitDoc swModel.GetTitle
strFileName = Dir
Wend
swApp.ExitApp
End Sub

2. Copy the code from the VB editor to Notepad and change the strFolderPath value to $$$FOLDER_PATH$$$. Your variable declaration for strFolderPath should now look like this:


Const strFolderPath As String = $$$FOLDER_PATH$$$

3. Save the text file as a .swb file.
4. Open Task Scheduler
5. Choose Run Custom Task
6. Click the Browse button next to Macro File Path and locate the .swb you just created
7. In the task parameters section, you should now see a parameter called FOLDER_PATH. Click in the Parameter String cell on the right and enter the directory that contains the files you want to convert to shaded without edges
8. After specifying the running mode, start time, and start date, click Finish and your task should be added to the queue. If you left the start time and date at their initial values then the task should start running immediately.
Example Solidworks macro
Example macro
Some additional comments and notes about using the Task Scheduler with macros:

  • You can also run regular .swp files using the Task Scheduler. With these files, however, you cannot specify parameters. The macro will simply run “as is”. To be able to specify parameters you have to use an .swb file.
  • Optionally, you can simply change the variables in the .swp file to $$$$$$, save the .swp file, and then rename the extension to .swp.
  • You can control string an numeric parameters using the Task Scheduler. Use $$$$$$ for string values and ###### for numeric values.
  • If you do not use ISldWorks::ExitApp at the end of your macro, the SolidWorks application will not close after the task is finished running. Consequently, the task will not be marked as Complete within the Task Scheduler.
  • You do not need to have the Task Scheduler open for the scheduled task to run.
  • Any dialog boxes created by macros run by the Task Scheduler will automatically be closed. This is done to prevent dialog boxes from stalling the execution of the tasks.


Article by Keith
How do you run your macros right now?

 Tools–>Macro–>Run? By clicking Run on the macro toolbar? If macros are even a small part of your workflow, you can do much better. In this post, I want to increase your versatility by showing you four ways you can run a macro without having to use the Run button.

1. Using custom toolbar and keyboard shotcuts

Many of you may know of this option already, but it is still worth mentioning. You can create custom toolbar shortcuts for any macro by going to Tools–>Customize, Commands tab, choosing the Macro category from the list on the left, and then dragging the New Macro Button icon onto a toolbar of your choose.
Solidworks-Add-Macro-Button
Add Macro Button
As soon as you release the mouse button, you should get a dialog prompting you for the macro location (which you can browse for), the button tooltip, and the method. Specifying the correct method is very important since this is the first method that will be run when the macro is executed.
Solidworks-Customize-Macro-Button
Customize Macro Button
If you want to take it step further, while you’re still in the Customize dialog box, go to the Keyboard tab, search for your new macro button, and add a keyboard shortcut.

2. When Solidworks starts

This option is invaluable for event-based macros that run code when a certain event fires, because it is ensures that you never forget to turn on the macro when SolidWorks starts. (To see some great examples of event-based macros, check out our Macro Library and look under the Notifications section.) After you create a shortcut directly from your executable, go into the shortcut properties and modify the target using the following syntax:

“<path to SolidWorks executable>” /m “<path to macro>”
As an example, if your SolidWorks executable is in the default file location on Windows 7 x64 and your macro, called “macro.swp”, is on C:\, your target would look like this:

“C:\Program Files\SolidWorks 2012\SolidWorks\” /m “C:\macro.swp”
Solidworks-Shortcut-property
Solidworks Shortcut property

3. From another macro


Yes, it is possible to “chain” macros to together using ISldWorks::RunMacro2. In this method you’ll find arguments that allow you to specify the path to the macro you wish to run and also the initial method that you want to run. This is a great option when you want to keep tasks separate in your macro workflow or quickly swap out tasks. For example, your main macro might have a form that allows a user to specify a macro to run before or after your main task is accomplished.
To see a very simple example of ISldWorks::RunMacro2, check out “Run a macro from another macro” in the Macro Library.

4. From the Design Binder

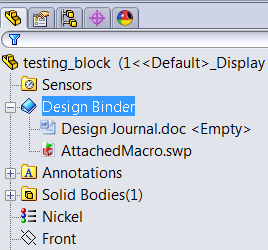
Many SolidWorks users do not know what the Design Binder is, let alone that you can run macros from it. The Design Binder is essentially a backpack for your SolidWorks model that allows you to attach relevant documents. This could include a word document, a spreadsheet, and, yes, even a macro. Consequently if you have written a macro specific to a document and need to make sure that the two stay together, attaching it to the Design Binder is a great option. Then if you write another macro that needs to run the macro attached to the Design Binder, you simply call ISldWorks::RunAttachedMacro. Much like ISldWorks::RunMacro2, you need to specify the sub procedure you want to run initially.
Solidworks-Design-Binder
Design Binder
Do you know of any other useful ways to run a macro? Please share below.

5. From the Task Scheduler

Have a macro that you’d like to run on all models in a directory while out of the office? Enter the Task Scheduler. Located in the SolidWorks Tools directory in your Start Menu, this program allows you to schedule batch operation tasks like updating the versions of your files, converting your models to DXF, updating custom properties, and so on. Those with SolidWorks Professional or Premium have the “Run Custom Task” option, which allows you to schedule the execution of a macro as well as specify its parameters. Learn more about using macros with the Task Scheduler here.

6. From a macro Feature

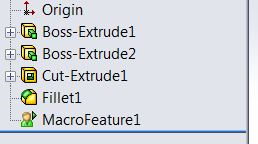
Macro features are custom SolidWorks features defined by the SolidWorks API. They reside in the feature-tree and can be added, edited, and deleted like any other feature. The bulk of the code defining a macro feature gets run when a document rebuilds, so during this time you can have the macro perform any task that doesn’t cause a rebuild. You can learn more about macro features here. Note, however, that macro features are ideally used for actually modifying geometry. If you simply want to run some code every rebuild, I’d encourage you to use equation-triggered macros instead, which are described in the next section.
Solidworks-Macro-Feature
Macro Feature

 7. From an equation

Few know that you can insert VBA code in an equation so that it gets run every time the equation is recalculated (which is every rebuild). Combine this trick with ISldWorks::RunAttachedMacro and ISldWorks::RunMacro2, which I described earlier in this post, and you have a pretty nifty technique for embedding and running macros while a part or assembly is open. Plus, the macro can travel with the document if you desire. These types of macros, which I call equation-triggered macros, are explained in great detail here. ETMs are usually the most effective way to run a macro without involving the end user.


Article by Keith
The spring is one of the standard products, which is often used, but it is desirable to automate the simulation. Fortunately, there are enthusiasts who undertake this work. Macro for creating springs of tension and compression "SpringSW" - author of Shvg. To use the macro, you must add it to add-ins. To do this, open "SpringSW.dll", then "Spring" will appear in the "Tools" menu. Use the look at the video. For the coupling of the spring into the part, there is an axis "Axis1". The build tree is hidden, but it's even better. The spring has several configurations in different states: compressed, working, etc. The macro allows you to build compression springs and also to edit the data. Easy and convenient to use.


Administrator rights are required to install and use the macro. You can change the shortcut to start


Download macro с SpringSW
When you are working with SOLIDWORKS you may see the rebuild icon next to some of the features every once in a while. This means that SOLIDWORKS needs to rebuild the model in order for the dimensional changes to take effect.

To rebuild the Solidworks model, you need to click on the rebuild icon from the standard toolbar. 
Rebuild icon
Rebuild icon

or click on rebuild under the Edit menu, or press Ctrl + B (default). 
This command rebuilds the features that have changed since the last save. When you reorder an imported feature or any other feature with no parent or child, the part does not rebuild - only the FeatureManager design tree rebuilds.
Rebuild Solidworks
Rebuild

Rebuild Solidworks
Rebuild
But sometimes that is not enough. For example, imagine some of data in your model has been corrupted (and that could happen due to numerous reasons). In that case rebuilding your model will not fix the issue as the rebuild command only rebuild the features that have been changed. In this case you need to use the other SOLIDWORKS rebuild command called Force Rebuild.

Force Rebuild command rebuilds every single feature in the design tree and as a result refresh the entire database of geometry. Unfortunately, there is no icon nor menu choice in SOLIDWORKS to execute that command. The only way that you can run Force Rebuild is by using Ctrl + Q shortcut key.
But sometimes this is not enough. For example, when some of the data in your model is corrupted (for various reasons). In this case, restoring your model will not solve the problem, since the "Rebuild" command restores only the changed items. In this case, you need to use another SolidWorks rebuild command called "Regeneration".


The Regeneration command rebuilds each individual function in the design tree and, as a result, updates all geometry. Unfortunately, Solidworks does not have an icon and a menu to execute this command. The only way you can start "Regeneration" is by pressing Ctrl + Q (the default value). You can assign your own hotkeys. You should know one thing: you can not assign the same hotkey to different commands for a part, assembly, and drawing using Solidworks. More precisely, you can not use the menu. When working with hot keys, Solidworks does not distinguish the document type and therefore assigns the same hotkey value to all types of documents at once. Perhaps you are faced with such a situation, when assigning a hotkey for example to the details, and a message is issued that such a key has already been assigned, although there is no hotkey in it. It is, only assigned to the assembly or drawing, and a list of hotkeys is shown for the current document type, i.e. For details. The command "Regeneration" by default in all documents is assigned to "Ctrl + Q".


In general, a standard adjustment using the toolbar button or a complete rebuild by pressing "Ctrl-Q" will update the model with the changes you have made. But you can add an extra step if you are working with complex models or surfaces.

By default, adjustments check each new or changed function only on neighboring faces and edges, which allows you to quickly rebuild and localize problems in most models.

When you work with complex models and surfaces, it is recommended that you perform thorough error checking every time to ensure that all functions are error-free. In the "Tools" - "Options" - the "System Settings" - "Performance" tab there is the option "Verification during rebuilding (enable extended body scan)"

Enabling "Advanced validation" will cause the model to check for new or changed functions on all faces and edges of the model. This will reduce performance, so you must disable this option after a full rebuild. Any errors should be corrected as soon as they are discovered, in order to ensure that future elements do not suffer. If this check is not performed, usually any geometry problems will not be displayed until the model is exported to another format for use by another CAD or CAM application.
source

Search This Blog

Избранное сообщение

SOLIDWORKS 2018 Import and Export Hole Wizard Data with Excel

You can now import and export Hole Wizard data with Excel files in the Configuration tool with SOLIDWORKS 2018.  Previously this could only ...

Popular posts