SOLIDWORKS Smart fasteners have their own page in the SOLIDWORKS Toolbox Settings: Step 5 – Configure Smart Fasteners. This is where washer size and fastener length are set and a default fastener is specified for the holes created without Hole Wizard.
Solidworks Smart Fasteners Options
Smart Fasteners Options

The option to change the default SOLIDWORKS Smart Fastener type for Hole Wizard holes can be found in the Step 1 – Hole Wizard of the Toolbox Settings. 
That is where each hole type gets a matching fastener from the Toolbox selection.
The Reassign button can be used to change the default fastener for the selected hole type.

Solidworks Reassign Default Smart Fasteners
Reassign Default Smart Fasteners


Article by Sanja Srzic

If you encounter problems with an installed SOLIDWORKS product
(e.g. SOLIDWORKS Premium, Simulation, PDM, Inspection, Electrical etc.), you can use the SOLIDWORKS Installation Manager to repair the installation.

 However, to repair an installation, your machine must have all the source files from the previous installation and any service packs that were applied, in the location where they were originally installed.
You can repair an individual installation. You cannot repair an administrative image; you must uninstall and then reinstall the administrative image

Repairing SOLIDWORKS installation


Here are the steps for repairing SOLIDWORKS:

Step 1. Make sure you have the SOLIDWORKS installation files. If you installed from the SOLIDWORKS DVD, place the DVD into the drive. 

 If you installed from a file set downloaded directly from solidworks.com, make sure the files are present in the SOLIDWORKS Downloads folder.

Step 2. If you are using Windows Vista or Windows 7, disable the User Account Control as directed in the article Avoid potential problems using SolidWorks with Windows Vista & 7


Step 3. Ensure that any antivirus and /or antispyware software services have been stopped. 

 This can be done by going to the Start menu and launching the Run dialog. Type in: services.msc then click Run. Find the antivirus and antispyware services in the list and select Stop.

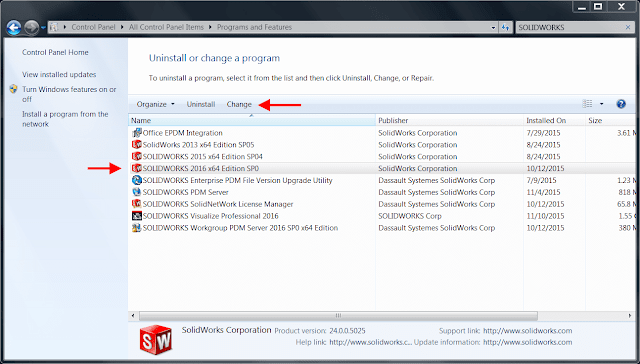
Step 4. Go to the Control Panel and open Add/Remove Programs if using Windows XP, Programs & Features if using Windows Vista or Windows 7.

Step 5. Select the SOLIDWORKS installation from the list and click Change.

Windows Control Panel

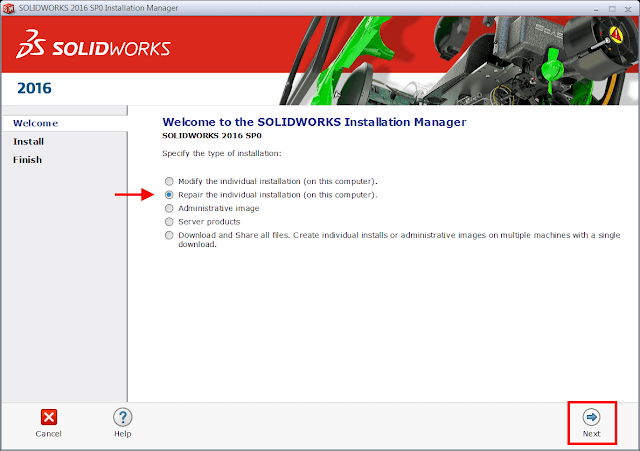
Step 6. Select the “Repair the individual installation” option and click Next.

Repair installation Manager

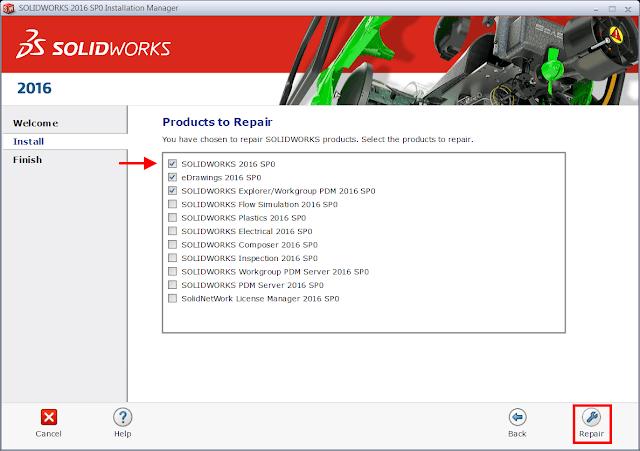
Step 7. On the Products to Repair screen, select the product to repair

Products to Repair
Products to Repair

Once the repair is complete, launch SOLIDWORKS to test if the issue has been resolved.

Article by Andrew Lidstone 

All SOLIDWORKS Toolbox parts have an internal file flag that sets them apart from regular SOLIDWORKS parts. 

This flag enables SolidWorks to recognize them as standard parts and places a Toolbox icon beside them in the FeatureManager Design Tree. If you have created custom fasteners by copying files out of the Toolbox folders, these will still be recognized as a Toolbox part. As these are now stand-alone parts, SolidWorks will not need to search for the references within the Toolbox. Therefore you should remove the internal flag to avoid file reference conflicts.
When copies of Toolbox files are saved externally from Toolbox, it is sometimes necessary to remove the flag which identifies the file as originating from Toolbox. This article explains how to remove the Toolbox flag as well as how to determine what the current flag status is.

Custom sizes of the default fasteners can be added directly to the Toolbox, but sometimes it is necessary to take a copy of the Toolbox file in order to adjust the geometry. This may be done as an alternative to remodelling the fastener from scratch.
One of the issues that arise when copying fasteners from Toolbox is that the resultant part file maintains an internal flag. This internal flag can force SolidWorks to revert back to the original Toolbox item instead of the saved out part file when opening an assembly.

One solution to this problem is to deflag the Toolbox item. The result of this will be that the file is no longer recognised as having originated from the Toolbox and instead becomes a standard part file.


sldsetdocprop

sldsetdocprop

Window Set Document Property

Set Document Property


  • Browse to your SOLIDWORKS installation folder (by default C:\Program Files\SOLIDWORKS Corp\SOLIDWORKS\Toolbox\data utilities)
  • Add the individual part file or folder of files to be deflagged by selecting ‘add files’ or ‘add directories’
  • Set the property state to ‘No’
  • Click "Update Status"
    Sometimes when you launch SOLIDWORKS and try to load SOLIDWORKS Toolbox Library or Utilities add-in, SOLIDWORKS delivers a message stating “You appear to have experienced problems the last time you loaded the SOLIDWORKS Toolbox add-in”. This issue is only experienced in SOLIDWORKS 2017 SP3.0
    SOLIDWORKS Error
    Error loading Toolbox Library 


    • If you pick yes, continue to load Toolbox, SOLIDWORKS possibly stops responding!
    • However, if you pick No, disabling Toolbox, everything seems to work fine.
    To fix this error you should delete the ‘tb_default.sldedb’ from ‘<C:\Users\<user>\AppData\Roaming\SOLIDWORKS\SOLIDWORKS 2017\Toolbox\data’.
    In Windows 7/Vista a  user can open his/her application data folder by running the command ‘appdata’ from Run window.


    Navigate to the specified path and delete ‘tb_default.sldedb’.


    Then launch SOLIDWORKS, you should have no issues adding the Toolbox Library or Utilities add-in.
    This issue has been fixed in SOLIDWORKS 2017SP4.

    Search This Blog

    Избранное сообщение

    SOLIDWORKS 2018 Import and Export Hole Wizard Data with Excel

    You can now import and export Hole Wizard data with Excel files in the Configuration tool with SOLIDWORKS 2018.  Previously this could only ...

    Popular posts